Friday, June 29, 2018
Review : B033 Folding Keyboard Touchpad
Thursday, May 24, 2018
Solusi : Mengatasi Windows Script Host Access is Disabled on This Machine
Saturday, March 17, 2018
Solusi : Mengatasi Bootloop pada LG G Pro 2
Solusi : Tidak perlu melakukan flash atau reset factory karena masalah utamanya ada pada battery. Cukup ganti battery LG G Pro 2 dengan yang baru dan lakukan nyalakan ulang. Sistem akan kembali normal dan smartphone pun bisa digunakan kembali,
Untuk saat ini (Maret 2018) battery LG G Pro 2 masih ada yang jual di toko online seperti Tokopedia dengan variasi harga mulai 80 ribu sampai dengan 150 ribuan.
Good Luck !!!
Wednesday, January 03, 2018
Broadcom 802.11ac Wireless PCIE tidak berfungsi setelah Update Win10 Fall Creators
- Buka Control Panel > System & Security > System > Device Manager
- Pilih Network Adapter dan pada menu Action > Update Driver
- Pilih "browser my computer for driver software"
- Pilih "Let me pick from a list of available drivers on my computer"
- Ada 2 driver yang terlihat yaitu Broadcom dan Microsoft, pilih Broadcom dan install
- Jika instalasi driver berjalan baik, maka Wi-Fi sudah bisa berfungsi. Restart jika perlu
Wednesday, November 22, 2017
Solusi : Mengatasi masalah printer LQ-300 dan LQ-310 saat cetak (No Respond)
- Buka Control Panel dan cari Add/Remove Program
- Uninstall update tersebut sesuai dengan versi sistem Windows yang digunakan
- Restart dan tunggu sampai proses recovery sistem selesai dan bisa Login
- Lakukan “Test Print”, sampai sini seharusnya printer dot matrix sudah langsung merespon dan mencetak
Tuesday, July 26, 2016
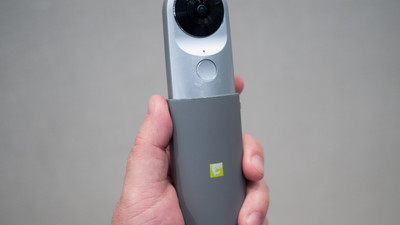
LG 360 Cam - LGR105
Dengan dual wide camera 13Mpx semua bisa tertangkap camera dengan baik, setingan camera/video juga bisa diubah-ubah dari 360 menjadi 180. Untuk melakukan foto/video maupun melihat hasil bisa mendownload program aplikasinya di playstore untuk Android yaitu 360 Cam Manager.
Dalam paket penjualannya terdiri dari LG 360 Cam, Cover dan Cable USB/microUSB type C.
Berikut Specification lengkapnya :
| Bluetooth Specification | V4.1 | ||||||||||||||||||||||||||||||
|---|---|---|---|---|---|---|---|---|---|---|---|---|---|---|---|---|---|---|---|---|---|---|---|---|---|---|---|---|---|---|---|
| Wi-Fi Specification | 802.11 b/g/n | ||||||||||||||||||||||||||||||
| USB Type | USB 2.0 (Type-C) | ||||||||||||||||||||||||||||||
| Battery | 1200 mAh | ||||||||||||||||||||||||||||||
| Optics | 13 M, 206° x 2 (Dual Fisheye Lens) | ||||||||||||||||||||||||||||||
| Max. Video Res | 2560 x 1280 (30fps) | ||||||||||||||||||||||||||||||
| Max. Photo Res | 5660 x 2830 (16M) | ||||||||||||||||||||||||||||||
| Image / Video File Format | Still Image : JPEG / Video : MP4 (MPEG-4 AVC/H.264, Audio : AAC 5.1Ch) | ||||||||||||||||||||||||||||||
| Capturing | Spherical / Half-spherical image & video | ||||||||||||||||||||||||||||||
| Sound | 3 Mic | ||||||||||||||||||||||||||||||
| External SD Card | Up to 2 TB | ||||||||||||||||||||||||||||||
| Dimensions/Weight | 40 mm x 97 mm x 25 mm / 76.7 g |
Wednesday, October 31, 2012
Solusi : Cara Rooting Galaxy Note GT-N7000 Gingerbread 2.3.6
Software yang perlu dipersiapkan sebagai berikut (silahkan search di xda-development forum atau email ke saya) :
- Odin3 v1.85 for PC (install di PC)
- Mobile Odin (install di Gadget)
- SGN_XX_OXA_KJI_FACTORYFS.tar (simpan di PC)
- N7000DXLA1_N7000LBKL2_N7000DXKL2_HOME.tar (simpan di SD Card)
- Proses Flash…
Warning!!
- Tekan VolumeUp untuk continue…
- Pasang kabel data USB antara PC dan Gadget. Tunggu sampai Odin mendeteksi port USB yang akan digunakan
- Tekan START dan tunggu sampai proses selesai dan gadget restart sendiri
- Jika sudah muncul tulisan PASS di Odin, tutup/close Odin di PC dan lepas kabel USB
- Proses Flash telah selesai sekarang bisa lanjut untuk Rooting
- Saatnya install firmware N7000DXLA1_N7000LBKL2_N7000DXKL2_HOME.tar
- Pada posisi mati, nyalakan Galaxy Note pada mode Recovery dengan cara tekan dan tahan secara bersamaan VolumeUp+Home+Power
- Install Mobile Odin, jika sudah jalankan Mobile Odin dan tap pada bagian “Open File”
- Pilih file N7000DXLA1_N7000LBKL2_N7000DXKL2_HOME.tar pada SD Card
- Centang pada “EverRoot”, “InjectSuperuser”, “InjectMobileODIN”,”InjectCWM Manager”
- Tap pada “Flash Firmware”
- Tunggu hingga proses flashing selesai dan gadget reboot sendiri
- Selesai
Wednesday, November 02, 2011
Solusi : Install Driver Scanner UMAX Astra 4100 di Windows 7
Punya Laptop dengan sistem Windows 7 dan Scanner UMAX Astra 4100 yang drivernya hanya untuk WindowsXP. Mencari di google untuk driver scanner Win7 juga tidak ditemukan (hanya untuk di WinXP saja).
Cause :
Driver Scanner UMAX Astra 4100 tidak bisa diinstal secara langsung di Windows 7, dan Windows 7 tidak dapat mengenal secara otomatis driver Scanner tersebut.
Solusi :
Sebelum menginstall driver ubah terlebih dahulu settingan driver agar bisa diinstal di Win7.
- Pada file driver scanner cari file setup.exe
- Klik kanan file tersebut dan pilih Properties
- Pada kotak dialog yang terbuka pilih Tab Compability
- Check Run this program in compatibility mode for: pilih Windows XP (Service Pack2)
- OK dan jalankan program
- Setelah proses selesai, JANGAN pilih Restart
- Lakukan proses compability pada file hasil setup (4100_USB_Scanner_Utility) menjadi windows XP seperti langkah diatas
- Restart
- Set default aplikasi untuk membuka hasil scan untuk mempermudah pengerjaan, misalnya saja menggunakan Adobe Acrobat Reader Profesional.
- Good Luck…!
Tuesday, December 29, 2009
Memasang Modem Huawei E800 di Mandriva 2010.0
Menginstall Modem ini di sistem Windows XP tentu sangat mudah, namun bagaimana jika kita ingin menggunakannya di sistem operasi linux seperti Mandriva. Apakah sama mudahnya?
Berikut adalah langkah-langkah memasang Modem Huawei E800 di Mandriva 2010.0 agar bisa berfungsi dengan baik :D
- pasang modem Huawei E800 di slot Express Card ¾-
- modem ini dikenal dengan nama
12d1:1003 – Huawei Technology CO. Ltd E220 HSDPA Modem / E270 HSDPA/HSUPA Modem
- klik Pusat Jaringan (simbolnya komputer – dikanan bawah layar-)
- pilih GPRS/Edge/3G – Huawei Technology Huawei Mobile
- pilih Konfigurasikan
- pilih provider yang akan digunakan, sebagai contoh
Negara → pilih Indonesia
pilih = Excelcomindo (XL)
APN = www.xlgprs.net
user = xlgprs
password = proxl
- klik OK
- pilih Sambungkan
Selamat berselancar.... :D
Good Luck!!!
Modem 3.5G Huawei E800 di Mandriva
Agak berbeda memang kondisi fisik Huawei E800 yang dijual disitus tersebut dengan yang ada di situs Huawei sendiri (www.huawei.com), karena pembungkus dari modem ini bertuliskan Base e-plus+ dengan dominan berbahasa Jerman.
Namun setelah melihat di balik modem, kita bisa yakin kalo ini memang Huawei E800.
Didalam kotak penjualannya terdapat juga slot adapter mini USB dan kabel mini USB jika diperlukan sebagai akses modem selain Express Card 3/4 tentunya. Tidak terdapat CD-Driver didalam kotak karena memang tidak diperlukan, modem ini sudah memiliki memory flash didalamnya yang berisikan driver Huawei E800.
Untuk instalasi pada WindowsXP, silahkan melakukan update firmware terbaru yang bisa didapat dari situs Huawei. Perbedaannya ada pada tampilan software Huawei, sebelum diupdate namanya adalah UMTS Modem Manager sedangkan setelah di update menjadi Mobile Partner.
Di Mandriva 2010.0, modem ini terdeteksi dengan baik dengan kode :
12d1:1003 – Huawei Technology Co.Ltd E220 HSDPA Modem/E270 HSDPA/HSUPA Modem
Entah mengapa namanya bukan E800, namun selama modem ini bisa digunakan, tidak menjadi masalah bagi saya :D
Good luck !!!
Sunday, November 22, 2009
Akses Internet di Mandriva 2010.0 dengan modem Nokia 2228
Mandriva 2010.0 sudah beredar, sudah saatnya Mandriva 2008 saya ganti :D
Ternyata banyak kemudahan yang saya dapat pada edisi terbaru ini terutama masalah hardware di Acer Aspire 4720, seperti sound yang sudah bisa bunyi lagi, webcam yang udah bisa langsung terdeteksi dan printer HP Deskjet D2556 yang bisa diajak nge-print. Selain itu bluetooth yang siap pake dan tentunya akses internet dengan modem Nokia 2228.
setelah googling dengan kata-kata Nokia dan Linux akhirnya saya mendapatkan cara lain yaitu dengan kata kunci wvdial :) - sudah dicoba pake KPPP tapi modem gk kedetek, terus pake wizard di “Configure Your Computer” malah minta PIN (4digit) -
Langkah-langkah untuk menggunakan modem Nokia 2228 di Mandriva 2010.0 sebagai berikut :
- buka konsole dan masuk sebagai superuser, pasang Modem Nokia 2228 dengan kabel data CA-101
- pastikan modem Nokia 2228 terdeteksi, caranya :
#lsusb
modem Nokia 2228 di laptop saya terdeteksi dengan kode 0421:00ba
- kemudian cek posisi USB
#dmesg
di laptop saya Nokia 2228 berada di /dev/ttyACM0
- bila wvdial sudah terinstall lewati langkah ini, jika belum install terlebih dahulu wvdial
#urpmi wvdial
- buat file dialer flexi (saat ini dibuat saya menggunakan flexinet unlimited)
[Dialer flexi]
Baud = 460800
ISDN = false
Idle Seconds = 180
Init1 = ATZ
Modem = /dev/ttyACM0
Modem Type = USB Modem
Password = telkom
Phone = #777
Product = flexi
Username = [isikan username yang diberi oleh flexi]
FlowControl = CRTSCTS
Ask Password = 0
Dial Command = ATDT
Stupid Mode = 1
Compuserve = 0
Auto DNS = 0
New PPPD = Yes
- simpan dengan menekan :w dan keluar :q
- jalankan
#wvdial flexi
- untuk putus cukup tekan CRTL+C
Untuk mempermudah menggunakan wvdial dari Xwindow, gunakan script .sh :
- buat script flexi.sh
#vi flexi.sh
- ketik seperti dibawah ini dan simpan
#!/bin/sh
wvdial flexi
- ubah permissionnya
$chmod +x -v flexi.sh
- letakkan script di Desktop (XWIndow) – cukup copy paste dari Home
- klik 2x untuk menjalankan
silahkan mencoba, klo masih gagal jangan tanya saya hehehehe.....
good luck !!!
Friday, November 07, 2008
Solusi : APPCRASH EXCEL.EXE di Vista
- Buka Regedit (klik Start>Run> ketik Regedit)
- Buka folder HKEY>LocalMachine>Software>Microsoft> Office>Excel>Addins>BtOfficeAddin.Integration1
- Lihat di sebelah kanan, ganti value dari LoadBehaviour dari (3) menjadi (0)
- Restart
Good Luck !!!
Solusi : Install Realtek HD Audio Driver di WinXP (No-Sound)
Installation failure and terminate alias laptop jadi bisu karena gagal mengenal Driver audio.
Cause :
Microsoft Universal Audio Architecture (UAA) driver terlalu memaksa (sok tau) ketika mengenali Realtek HD :) pada saat instalasi
Solusi :
- Hapus (UnInstall) terlebih dahulu program Realtek HD Audio
- Disable MS UAA Bus Driver for HD Audio Realtek, caranya : Buka COntrol Panel>Device Manager> cari System Device (bagian bawah) > pada Ms UAA Bus Driver klik kanan pilih Disable trus UnInstall
- Install kembali Realtek HD Audio Driver
- Restart
- Biarkan system beberapa saat mengenal secara automatis driver Realtek dan MS UAA
- Selesai...
Good Luck !!!
Tuesday, September 02, 2008
Speed Up Firefox
If your using Firefox on a broadband connection...this will speed up your browsing significantly.
1. Type "about:config" into the address bar and hit return. Scroll down and look for the following entries(open a new window to do this ) :
network.http.pipelining
network.http.proxy.pipelining
network.http.pipelining.maxrequests
Normally the browser will make one request to a web page at a time. When you enable pipelining it will make several at once, which really speeds up page loading.
2. Alter the entries as follows: (double click the entry to change)
Set "network.http.pipelining" to "true"
Set "network.http.proxy.pipelining" to "true"
Set "network.http.pipelining.maxrequests" to some number like 30. This means it will make 30 requests at once.
3. Lastly right-click anywhere and select New-> Integer. Name it "nglayout.initialpaint.delay " and set its value to "0". This value is the amount of time the browser waits before it acts on information it receives.
Sumber : PCLOS Magazine edisi Agustus 2008
Wednesday, August 20, 2008
Step by Step Perbaikan Komputer
Salah satu cara virus mempertahankan keberadaannya adalah dengan memblokir akses ke Registry Editor. Komputeron Registry Unlocker membuka blokir agar pengguna bisa mengakses Registry Editor.
2. Restore Explorer.exe
Beberapa virus berupaya untuk tetap hidup selama Windows berjalan dengan cara mendompleng file explorer.exe. Komputeron Registry Unlocker akan mengembalikan file explorer.exe ke keadaan normal dengan membuang string virus.
3. Enable Task Manager
Untuk mencegah pengguna mematikan proses virus, akses ke Windows Task Manager diblokir. Komputeron Registry Unlocker akan membuka blokir ini.
4. Restore Microsoft Registry Editor (regedit.exe)
Beberapa jenis virus akan membuat file regedit.exe dan regedt32.exe tidak bisa dijalankan lagi. Biasanya jika kita rename file regedit.exe baru bisa dijalankan. Namun dengan Komputeron Registry Unlocker, Anda tidak perlu sampai melakukan rename file regedit.exe.
5. Restore System Configuration Utility (msconfig.exe)
Proses virus dapat hidup setiap kali Windows dijalankan dengan mendompleng pada startup. Untuk mencegah pengguna membuang virus dari daftar startup Windows, sebagian virus membuat file msconfig.exe tidak bisa dijalankan. Gunakan Komputeron Registry Unlocker untuk membuat msconfig.exe bisa dijalankan kembali.
6. Enable Folder Options
File virus seringkali tidak terlihat di Windows Explorer atau My Computer karena attribute dari file virus seringkali diset hidden atau super hidden atau menyamar menjadi file system Windows. Agar pengguna tidak bisa melihat file hidden atau file system, virus membuat Folder Options menghilang atau tidak bisa diakses. Gunakan Komputeron Registry Unlocker untuk memunculkan kembali Folder Options.
7. Enable to change IE homepage
Sebagian virus dan malware memaksa pengguna untuk membuka situs web tertentu saat menjalankan Internet Explorer (IE) dengan menjadikan alamat situs web tersebut homepage dan mencegah pengguna untuk mengubah homepage IE. Komputeron Registry Unlocker memungkinkan pengguna untuk mengubah kembali homepage IE nya.
8. Enable Run Command
Virus seringkali menghilangkan menu yang terdapat di Start - Run... untuk mempersulit pengguna mengakses berbagai utility Windows. Jalankan Komputeron Registry Unlocker untuk memunculkan kembali menu ini.
9. Enable Command Prompt (cmd.exe)
Command Prompt bisa digunakan oleh pengguna yang berpengalaman untuk menganalisa dan mematikan proses virus. Itu sebabnya virus seringkali memblokir akses ke Command Prompt. Buka blokir ini dengan Komputeron Registry Unlocker.
sumber : http://komputeron.livejournal.com/907.html
Tuesday, July 08, 2008
Bikin Blog di Ms Word
Untuk pendaftaran, Anda memang harus online. Akan tetapi, untuk menulis Anda tidak perlu online supaya bisa menghemat biaya ber-Internet. Cara yang paling sederhana adalah dengan menulis blog dulu di penyunting teks, seperti Notepad atau Microsoft Word, secara offline. Kalau sudah selesai, baru online, kemudian buka situs Web layanan blog, login, lalu copy-paste hasil tulisan yang ada di penyunting teks.

Kita sebut cara yang barusan disebut adalah cara manual. Cara yang akan dijelaskan berikutnya kita sebut dengan cara otomatis. Tulisan tetap dibuat secara offline. Online-nya baru nanti, setelah tulisan selesai dibuat. Cara otomatis ini menggunakan Microsoft Word. Tapi, bukan sebarang Microsoft Word, melainkan Microsoft Word yang sudah dilengkapi dengan add-on bernama Blogger For Word. Aplikasi tambahan gratisan itu bisa didapat dari http://buzz.blogger.com/bloggerforword.html. Ukuran paket instalasinya kecil, cuma 2MB.
Cara pemakaiannya bisa diringkas seperti ini. Setelah Blogger For Word di-install, toolbar Blogger akan muncul pada Microsot Word. Kemudian, tuliskan isi blog seperti biasa, tetapi jangan online dulu, offline saja. Kalau tulisan sudah selesai, nyalakan koneksi Intenet, lalu publish deh.
Nah, cara detailnya seperti ini. Oh ya, PCplus pakai Word 2007 untuk artikel ini. Di versi lama mungkin berbeda, tetapi sedikit saja.
1. Klik [Add-Ins] pada menu di sebelah atas. Opsi [Add-Ins] sebaris dengan [Home], [Insert], [Page Layout], dan lain-lain.
2. Klik [Blogger Settings], kemudian pada kotak yang muncul, masukkan username dan password untuk masuk ke Blogger. Klik [OK].
3. Ketikkan isi blog di dalam Word. Kalau sudah selesai, online-lah. Kemudian, klik [Publish].
4. Masukkan judul blog dan pilih blog yang akan berisi tulisan itu. Klik [Send]. Selesai.
Sumber : Pcplus
Good Luck !!!
Thursday, June 05, 2008
"Error 691" or "Error 734" When You Attempt to Establish a Dial-Up Connection in Windows XP
Article ID : 310431
Last Review : November 4, 2003
Revision : 1.0
This article was previously published under Q310431
SYMPTOMS
When you attempt to establish a dial-up connection, you may receive an error message similar to one of the following:
Error 691: The computer you are dialing in to cannot establish a Dial-Up Networking connection. Check your password, and then try again.
-or-
Error 691: Access was denied because the username and/or password was invalid on the domain. -or-
Error 734: The PPP link control protocol was terminated.
As a result, you cannot establish a dial-up connection.
CAUSE
This behavior can occur if any of the following conditions are true:
• The Include Windows logon domain check box is selected in the Options tab of the dial-up connection's Properties dialog box.
-or-
• An incorrect user name or password is used.
-or-
• The dial-up connection's security option is incorrectly configured to use the Require secured password setting.
RESOLUTION
To resolve this behavior, follow these steps:
1. Click Start, point to Connect To, and then click your dial-up connection.
2. Click Properties, and then click the Options tab.
3. Click to clear the Include Windows logon domain check box (if it is selected), and then click OK.
4. Click Dial.
• If this procedure resolves the issue, and you can establish a dial-up connection; you do not need to follow the remaining steps in this article.
• If this does not resolve the issue, and you cannot establish a dial-up connection, go to step 5 to further troubleshoot this issue.
5. In the Connect dialog box, verify that your user name and password are correctly typed in the User name and Password boxes, and then click Dial.
• If this procedure resolves the issue, and you can establish a dial-up connection; you do not need to follow the remaining steps in this article.
• If this does not resolve the issue, and you cannot establish a dial-up connection, go to step 6 to further troubleshoot this issue.
6. Click Start, point to Connect To, and then click your dial-up connection.
7. In the Connect dialog box, click Properties.
8. Click the Security tab.
9. Under Security options, click Allow unsecured password in the Validate my identity as follows box, and then click OK.
Thursday, May 08, 2008
Manajemen iPod dengan Amarok (PCLOS)
The problem was when unplugged the iPod didn't think it had any songs. Searching on the web led me to this procedure.
Connect your iPod with the usb cable. Type the following as root in a terminal:
lsusb -v | grep -i Serial
Among other output you will get a line looking like 000A1234567891231.
Copy this line.
Navigate to your_iPod/iPod_Control/Device folder and open the file called SysInfo. Paste the line to the file but append FirewireGuid: so that it finally looks like
"FirewireGuid: 000A1234567891231"
Save and exit.
This allowed me to send and remove songs, and album art with the iPod. The next issue is with eject. The web is full of dire warnings about ejecting your iPod before removing it for fear of corrupting the filestructure. For me, Kde was requiring root privileges to eject the device. This was easily done from konsole but I wanted to use the configurable disconnect button in Amarok. This is what worked for me. As root using kwrite I edited my /etc/sudoers file to include this line "ALL NOPASSWD: /usr/bin/eject /dev/sdb"
This allows anyone to eject /dev/sdb without a password. One would have to modify the above command to reflect where their device is mounted.
So, the config of my disconnect button in Amarok is "sudo eject /dev/sdb"
Hopefully, this will help someone get their iPod working with Amarok in PCLinuxOS.
Edit: Since I posted this I have been cautioned that if one had several USB devices and plugged and unplugged them in a changing order my eject command might be not be specific to the iPod only. I've been doing more testing and though I've been told removable media devices do not use /etc/fstab for instructions this works for me.
I include this line in /etc/fstab:
"/dev/sdb /media/ipod vfat rw,user,noauto 0 0"
I also changed my line in /etc/sudoers to:
"ALL ALL= NOPASSWD: /usr/bin/eject /media/ipod"
And finally, as you might have guessed I changed my disconnect button command to:
"sudo eject /media/ipod"
Testing with a USB stick and the iPod both plugged in shows this command to eject the iPod (no password) and the USB stick is still available.
Can I transfer my album art or videos?
Album art works for me. I think you need to have it in your Amarok collection before you transfer to your iPod. In your collection, drill to the song. There will be an icon that looks like a jewel case. Right click and choose get album art. Pick the one you like then transfer that song to your iPod, the art will come along.
If you have songs with no art you may have to delete the songs from your iPod, get the art, then transfer it back to the the iPod. I've been able to get video on and off the iPod like this.
First get gtkpod, ffmpeg, and winff from Synaptic.
Take some video from whatever source: if you're ambitious you could rip it from a DVD with DVD::rip
Point winff at it as the source. Choose one of the iPod choices in the 'format to convert to' drop down box. Let it do it's magic, then use gtkpod to send it to the iPod. One could use gtkpod for all iPod management, but I prefer the Amarok interface. Unfortunately, Amarok
doesn't seem to be able to transfer video to the iPod. Have Fun!
Sumber : PCLOS Magazine edisi Mei 2008
Sunday, April 20, 2008
Surfing di PDA dengan Modem CDMA
Penerapannya cukup sederhana yaitu menjadikan Nokia 6265 sebagai modem bagi PDA HTC Touch. Langkah-langkahnya sebagai berikut :
Langkah 1 :
Aktifkan Bluetooth dikedua perangkat, kemudian lakukan pairing. Caranya, dari menu utama PDA, pilih “Start” > “Setting” kemudian pindahkan ke tab “Connection” lalu pilih “Bluetooth”
Lihat di kolom yang muncul, pilih “Add new device”, setelah itu PDA akan mencari perangkat Bluetooth lainnya. Jika sudah, pilih dan masukkan kode pairing.
Langkah 2 :
Pilih nama Bluetooth ponsel CDMA tadi kemudian beri tanda centang di bagian “Dial up Networking”
Langkah 3 :
Buat koneksi baru. Caranya, dari menu “Setting” geser ke tab “Connections” kemudian pilih menu “Connections”. Pilih “Add a new modem connections”.
Langkah 4 :
Selanjutnya akan muncul kotak “Enter a name for the connection”, isikan nama koneksi (misalnya : cdma). Pada kotak “select a modem” pilih Bluetooth kemudian klik Next
Pilih modem yang akan digunakan (Nokia 6265), lalu klik Next
Masukkan nomor dial #777 untuk koneksi internet operator CDMA.
Selanjutnya masukkan username dan password sesuai operator CDMA yang dipakai, yaitu :
Telkom Flexi
Username : telkomnet@flexi
Password : telkom
Mobile 8
Username : m8
Password : m8
Starone
Username : starone
Password : indosat
Esia
Username : esia
Password : esia
Langkah 5 :
Coba koneksi baru tadi, masuk ke menu Setting>Connections pilih Connections. Pilih “Manage existing connections”. Pilih nama koneksi (cdma) tekan agak lama kemudian pilih “Connect”
Hasilnya :
Coba untuk membuka halaman web, pada PDA akan terlihat halaman web sedangkan pada Ponsel CDMA akan terlihat proses komunikasi datanya.
Sumber : tabloid Pulsa edisi 129/V/2008
Good Luck !!!